Clinical Skills: Neurological Examination Sensory
Document from University about Clinical Skills: Neurological Examination Sensory. The Pdf provides a detailed guide to the neurological sensory examination, covering vibration sense, joint position sense, pain, temperature, and discrimination. This University document is useful for students and healthcare professionals.
See more11 Pages


Unlock the full PDF for free
Sign up to get full access to the document and start transforming it with AI.
Preview
Neurological Examination Sensory Notes
Sensory examination requires considerable concentration on the part of both patient and examiner.
Vibration sense and joint position sense are usually quick and easy.
In all part of the sensory testing is essential first to teach the patient about the test. Then perform the test.
Always compare symmetric areas on the two sides When testing pain, temperature, and touch, also compare distal with proximal. Scatter the stimuli to sample most of the dermatomes and peripheral nerves.
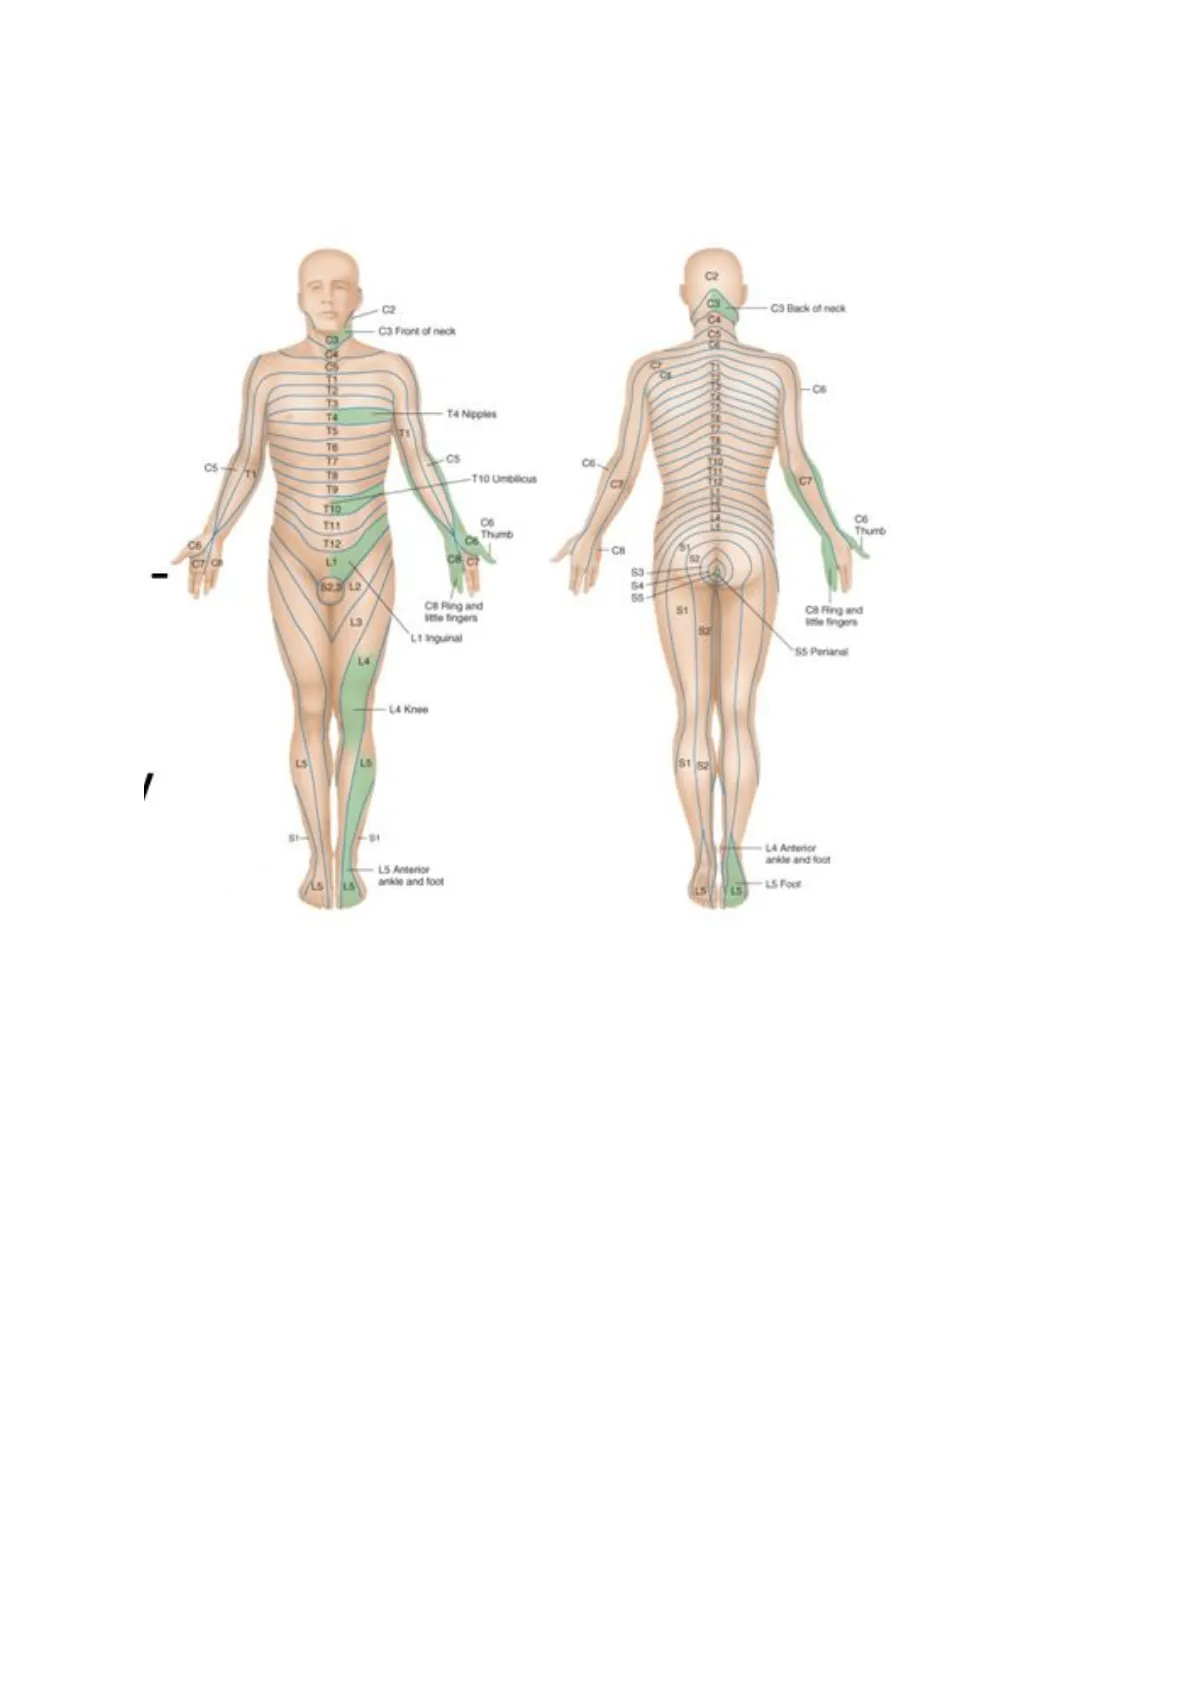
One suggested pattern: C4 (shoulder), C6 and T1 (inner and outer aspect of forearm), C6 an C8 (thumb and little finger), L2 (front of the thigh), L4 and L5 (medial and lateral aspect of calves), S1 (little toe), S3 (medial aspect of buttock)C2 C3 Back of neck C3 Front of neck CA 19 -C6 T3 14 Nipples T4 T5 Te TT CS-TV T10 Limblicus B 110 C6 CH C7 - 82.3 12 CB Ring and itte fingers 81 C8 Fling and lote fingers L1 Inguinal SS Perianal L4 -LA Knee LS LS 81 52 -- SI LA Anterior ankde and foot 15 Anterior ankle and foot 15 L5 When testing vibration sense and position sense, first test fingers and toes. If these is normal, you may safely assume that more proximal areas are also normal.
Vary the pace of your testing: this is important so that the patient does not merely respond to your repetitive rhythm If you detect an area of sensory loss or hypersensitivity, map out its boundaries in detail. Stimulate first at a point of reduced sensation and move by progressive steps until the patient detects a change.
N.B. Before each of the following test, show the patient what you plan to do and what responses you want. Unless otherwise specified, the patient's eyes should be closed during actual testing
LS Foot CO Thumb Thumb T12
Vibration Sense Testing
Use a low pitch tuning fork (128 Hz) How to activate the tunic fork (TF): tap the TF on the heel of your hand Demonstrate: ensure the patients understand they have to feel vibration by placing it on the sternum Test: Ask the patient to close the eyes. Lower limb: Place the TF on the distal interphalangeal joint of the big toe and ask if they feel a vibration. If you need to proceed proximally, place the TF on the medial malleolus, patella, superior inferior iliac spine. Upper limb: place the TF on the distal interphalangeal joint of the index finger. If you need to proceed proximally, you can use the ulnar styloid process, and the lateral epicondyle, clavicle. Check: check if the patient reports feeling the vibration and not just the contact of the tuning fork. Do the maneuver as usual and then stop the vibration with your hand keeping the fork on the bony protuberance, Ask the patient to tell you when the vibration stops.
2A 2C 1A 1B 2B
Note. The tuning fork is firmly tapped on the palm and then placed at the distal interpha- langeal joint of the index finger (2A), the ulnar styloid (28), and the lateral epicondyle (2C). 1C 1E 1D
Note. The tuning fork is firmly tapped on the palm and then placed on the interpha- langeal joint of the great toe (1A). If vibration sensation is diminished or absent in the great toe, testing should be performed at the middorsal foot (1B) and the medial malleolus (1C), followed by the midfibular (1D) and patellar (1E) regions.
Joint Position Sense Examination
Demonstrate: with the patient's eye open, show them what you are going to do.Hold the distal phalanx of the big toe between your fingers (hold it by the side, ensure that your fingers are 90 degree with the direction of the movement) and pull it a bit away from the other toes (to prevent tactile stimuli to affect position sensing). Move the digit up or down, clarifying with the patient the directions Test and check: Ask the patient to close the eyes Move the toe up or dawn asking the patient which is the direction. Start with large movements and progressively reduce the range until errors are made Repeat several times for each side, avoiding simple alternation of the stimuli. In the lower limb, if further testing is needed, you can proceed to the ankle joint, to the knee joint, and to the hip join. In the upper limb: start with the interphalangeal joint. If necessary, you can move to the metacarpophalangeal joints, to the wrist joint, elbow, and shoulder
Pain Pinprick Test
Use a neurological pin, a safety pin, a broken cotton swab, a broken tongue stick. Try to produce a stimulus of the same intensity each time Demonstrate: show the patient what you are going to do. Explain that you want to be told if the pin is sharp or blunt. Touch, for example the base of the sternum with your tool and ask the patient to tell you the difference. Test: ask the patient to close the eye and then apply randomly sharp and blunt stimuli Screening test: start distally and proceed proximally. Aim to stimulate points in each dermatome and in each main nerve territory
Light Touch Assessment
Use a piece of cotton wool Try to produce a stimulus of the same intensity each time Avoid dragging across the skin or tickling the patientDemonstrate: show the patient what you are going to do. Ask to say "yes" every time they feel being touched Test: ask the patient to close the eye; test the areas as for pinprick
Temperature Sensation Testing
Simple screening: use the tuning fork to ask the patient if they feel cold. Start with feet and hands and proceed proximally if there is no appreciation Formal testing: fill one vial with cold water and the other with warm water. Dry the tubes. Demonstrate: Ask the patient to tell you if you are touching the skin with the cold or the warm tube. Test: ask the patient to close the eyes. Apply hot or cold at random to hands and feet or other areas of interest
Discrimination Tests
Two-Point Discrimination
Use the appropriate instrument or the two ends of an opened paper clip. Demonstrate: "I'm going to touch you with either two points together" (touch unaffected area with the points set widely apart) "or with one point" (touch the area with one point). "I need you to tell me if you fill one point or two points) Testing: Touching alternating with one point and two points, progressively reduce the distance between the two points Normal distance at the finger pad: index finger < 5mm; little finger < 7 mm; big toe < 10 mm N.B varies considerably with thickness of skin
Stereognosis Examination
Patient's eyes closed Place in the hand of the patient a familiar object and ask for identification. Distinguishing head from tail in a coin is a sensitive test for stereognosis
Number Identification (Graphestesia)
With the blunt end of a pen or pencil, draw a large number on in the patient's palm. A normal person can identify most numbers This test can be useful with patients suffering from motor impairment, arthritis, or other conditions that prevent them from manipulating an object well enough to identify it.Focus on learning the dermatomes shaded in green
Dermatome Mapping
C2 C3 Back of neck C3 Front of neck 12 T3 TA 14 Nipples TS Te C5 B T9 110 O Thumb C6 T12 CH CT 12 CB Ring and little fingers CB Ring and lote fingers L1 Inguinal SS Perianal L4 -- LA Knee LS 81 F-SI LA Anterior ankde and foot -15 Anterior ankle and foot LS Foot 17 Ce Thumb c& CSupraclavicular nerves from cervical plexus (C3, C4) Axillary Nerve Superior lateral brachial cutaneous nerve (CS, C6) Radial Nerve Inferior lateral brachial cutaneous nerve (CS, C6) Posterior antebrachial cutaneous nerve (C6, C7) Intercostal brachial nerve (T2) Medial brachial cutaneous nerve (C8, T1, T2) Medial antebrachial cutaneous nerve (CS, C6) Lateral antebrachial cutaneous nerve (C5, C6) Radial Nerve Superficial branch (C6, C8) Median Nerve (C6, C8) Ulnar Nerve (C8, T1) n Č3 C4 C3 C4 T2 T2 C5 C3 C4 C5 C5 C6 T1 C7 C8 T1 T1 C6 C6 C8 C8 C7 C7 (b) (a) T2Posterior rami (L1 to L 3) Posterior rami (S1 to $3) Obturator nerve Lateral cutaneous nerve of thigh Posterior cutaneous nerve of thigh -Obturator nerve Femoral nerve Common fibular nerve -Femoral nerve (saphenous nerve) Femoral nerve (saphenous nerve) Common fibular nerve (superficial branch) -Tibial nerve (sural nerve) -Tibial nerve Common fibular nerve (deep branch)Schematic demarcation of dermatomes shown as distinct segments. There is actually considerable overlap between any two adjacent dermatomes C2 C3 -- C2 C3 C4 C5 C T1 T2 T3 -C6 T4 T5 T1 T6 T7 -- C5 DO T8 T9 T10 T11 T12 C8- C7 -- C8 'S2 53 12 S4- S5 S1 S2 11/ 12- 13 S1 S2 14- S1 L5 L4- Levels of principal dermatomes C5 Clavicles C5, 6, 7 Lateral parts of upper limbs C8, T1 Medial sides of upper limbs C6 Thumb C6, 7, 8 Hand C8 Ring and little fingers T4 Level of nipples T10 Level of umbilicus T12 Inguinal or groin regions L1, 2, 3, 4 Anterior and inner surfaces of lower limbs Foot L4, 5, S1 L4 Medial side of great toe S1, 2, L5 Posterior and outer surfaces of lower limbs S1 Lateral margin of foot and little toe $2, 3, 4 Perineum 15 -S1 CION L5 -1.4 S LI 52. 13 14 .C6. C7 C8 C6
Cutaneous Nerves Overview
Lateral femoral cutaneous branch of subcostal nerve (2) Genitofemoral nerve (LI-L2) Superior cluneal nerves (LI-L3) Lateral cutaneous branch of iliohypogastric nerve (LI) Middle cluneal nerves (LI-L3) Lateral femoral cutaneous nerve (L2-L3) Lateral femoral cutaneous nerve (L2-L3) Intermediate femoral cutaneous nerve (L2-L3) Posterior femoral cutaneous nerve ($1-$3) Medial femoral cutaneous nerve (L2-L3) Lateral sural cutaenous nerve (L5-$2) Lateral sural cutaneous nerve (L5-$2) Saphenous nerve (L3-L4) Superficial fibular nerve (L4-51) Superficial fibular nerve (L4-SI) Medial calcaneal branches ($1-$2) Sural nerve ($1-$2) Sural nerve ($1-$2) Deep Fibular nerve (L5) ANTERIOR REV Med POSTERIOR
Skin Region Measurements
| S. No | Skin region | Men (in mm) | Women (in mm) | p Value" |
|---|---|---|---|---|
| 1 | Upper lateral arm | 38.1±1.1 | 42.3±1.1 | 0.48 |
| 2 | Lower lateral arm | 33.7±1 | 35.6±1 | 0.40 |
| 3 | Upper medial arm | 36.2±1.1 | 36.9±1 | 0.90 |
| 4 | Mid medial arm | 33.5±1 | 33.1±1.2 | 0.94 |
| 5 | Lower medial arm | 24.8±1 | 25.2±1.2 | 0.96 |
| 6 | Upper posterior arm | 35.6±1.2 | 35.2±1.3 | 0.96 |
| 7 | Mid posterior arm | 37.3±1 | 36.8±1.3 | 0.74 |
| 8 | Lower posterior arm | 28.9±1 | 26.1±1.5 | 0.46 |
| 9 | Mid lateral forearm | 29.1±1 | 28.3±1 | 0.74 |
| 10 | Mid medial forearm | 27.4±1 | 24.5±1 | 0.24 |
| 11 | Mid posterior forearm | 28.2±1 | 24.3±1.1 | 0.13 |
| 12 | 1st dorsal interosseous | 14.5±1 | 13.1±0.8 | 0.58 |
| 13 | Palmar surface of distal phalanx thumb | 3.1±0.1 | 3.3±0.3 | 0.84 |
| 14 | Palmar surface of distal phalanx middle finger | 3.2±0.1 | 2.7±0.1 | 0.23 |
| 15 | Palmar surface of distal phalanx little finger | 3.1±0.1 | 2.0±0.1 | 0.05 |
# - Student's t test Medial plantar nerve (L4-L5) Lateral plantar nerve ($1-$2) Cutaneous branch of obturator nerve (L2-L3)
Can’t find what you’re looking for?
Explore more topics in the Algor library or create your own materials with AI.
